提督業プラグインを作ってみよう(5)ウィンドウ表示タイミングを変更しよう
現在は、プラグインがロードされたタイミングで艦隊情報ウィンドウが表示されていますが、艦これの起動を検知して、そのタイミングで艦隊情報ウィンドウを表示するように変更します。
1.艦これの開始を監視して、開始されたらメッセージを投げる
艦これが始まると、KanColleModel.IsRegisteredプロパティがtrueになるのでそれを監視すれば艦これの開始を検知できます。実際のコードを以下に記載します。
- InformationViewModel.cs
public class InformationViewModel : Livet.ViewModel
{
    //艦これの情報はここからみんな持ってきます
    private KanColleModel Kancolle { get; } = KanColleModel.Current;

    private PropertyChangedEventListener listener;

    /// <summary>
    /// 艦隊情報
    /// </summary>
    public FleetViewModel[] Fleets { get; private set; }

    public InformationViewModel()
    {
        listener = new PropertyChangedEventListener(Kancolle);
        //艦これの開始を監視して、開始されたらRegister()を呼ぶ
        listener.RegisterHandler(() => Kancolle.IsRegistered, (s, e) => Register());
        //艦これの艦隊情報の変化を監視して、変化があったらUpdateFleets()を呼ぶ
        listener.RegisterHandler(() => Kancolle.Fleets, (s, e) => UpdateFleets());

        this.CompositeDisposable.Add(listener);
    }

    public void Initialize()
    {
    }

    /// <summary>
    /// 艦これが始まったときに呼ばれる
    /// </summary>
    private void Register()
    {
        Messenger.Raise(new InteractionMessage("InfoShow"));
    }

    /// <summary>
    /// 艦隊情報が更新されたときに呼ばれる
    /// </summary>
    private void UpdateFleets()
    {
        var fleets = this.Kancolle.Fleets;

        if (fleets == null) return;

        Fleets = fleets.Select(f => new FleetViewModel(f)).ToArray();
        RaisePropertyChanged(nameof(Fleets));
    }
}
2.メッセージをViewで受け取ってコードビハインドを呼ぶ
- ソリューションエクスプローラーでプロジェクトを右クリックして「Blendでデザイン」を選択
- InformationWindow.xamlをアクティブにしたら、 「アセット」パネルを表示して、「ビヘイビアー」「Livet」「LivetCallMethodAction」の順に選択する

- 選択した「LivetCallMethodAction」を「オブジェクトとタイムライン」パネルの「MetroWindow」にドラッグする
- XAMLの「LivetCallMethodAction」をクリックして「プロパティ」パネルのTriggerTypeの横にある「新規」ボタンを押す
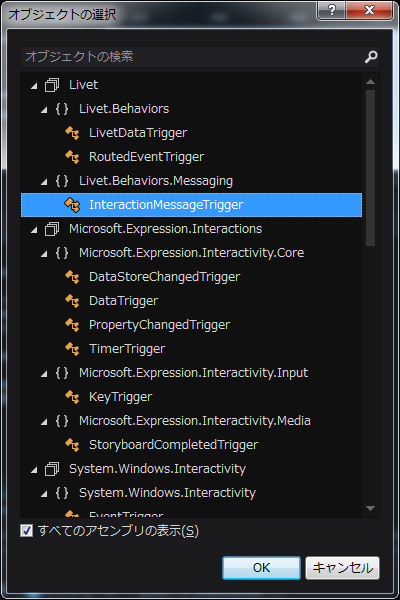
- 出てきた「オブジェクトの選択」ダイアログから「InteractionMessageTrigger」を選択して「OK」ボタンを押す

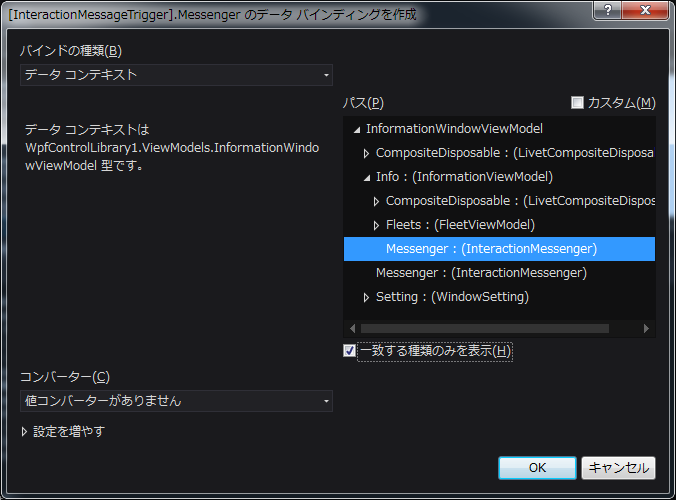
「プロパティ」パネルからトリガー MessageKeyに「InfoShow」Messengerは「データバインディングの作成」を選択して「Info.Messenger」を選択してOKを押す

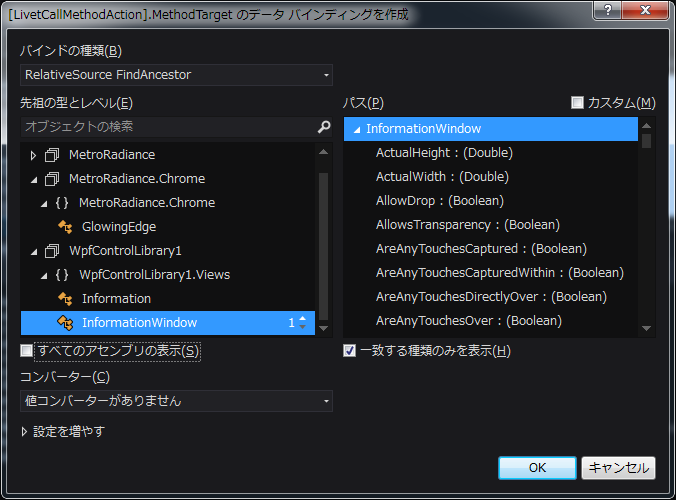
「プロパティ」パネルのその他の指定からMethodNameに「ShowWindow」MethodTargetは「データバインディングの作成」を選択してバインドの種類「RelativeSource FindAncestor」先祖の型とレベル「InformationWindow」を選択してOKを押す

- コードビハインドでウィンドウを表示する関数を実装 InformationWindow.xaml.csに「ShowWindow」という名前の引数、返り値なしの自分自身を表示する関数を実装
実際のコードを以下に記載します
- InformationWindow.xaml
<metro:MetroWindow
    xmlns="http://schemas.microsoft.com/winfx/2006/xaml/presentation"
    xmlns:metro="http://schemes.grabacr.net/winfx/2014/controls"
    xmlns:x="http://schemas.microsoft.com/winfx/2006/xaml"
    xmlns:d="http://schemas.microsoft.com/expression/blend/2008"
    xmlns:mc="http://schemas.openxmlformats.org/markup-compatibility/2006"
    xmlns:local="clr-namespace:プロジェクト名.Views"
    xmlns:vm="clr-namespace:プロジェクト名.ViewModels"
    xmlns:i="http://schemas.microsoft.com/expression/2010/interactivity"
    xmlns:l="http://schemas.livet-mvvm.net/2011/wpf"
    x:Class="プロジェクト名.Views.InformationWindow"
    mc:Ignorable="d"
    Background="{DynamicResource ThemeBrushKey}"
    Foreground="{DynamicResource ActiveForegroundBrushKey}"
    Title="InformationWindow" Height="400" Width="300"
    d:DataContext="{d:DesignInstance {x:Type vm:InformationWindowViewModel}}"
    Topmost="{Binding Setting.TopMost, Mode=TwoWay}"
    WindowSettings="{Binding Setting, Mode=OneWay}"
    IsRestoringWindowPlacement="True">

    <metro:MetroWindow.Resources>
        <ResourceDictionary>
            <ResourceDictionary.MergedDictionaries>
                <ResourceDictionary Source="KanColleResource.xaml"/>
            </ResourceDictionary.MergedDictionaries>
        </ResourceDictionary>
    </metro:MetroWindow.Resources>

    <i:Interaction.Triggers>
        <l:InteractionMessageTrigger Messenger="{Binding Info.Messenger}" MessageKey="InfoShow">
            <l:LivetCallMethodAction MethodName="ShowWindow" MethodTarget="{Binding Mode=OneWay, RelativeSource={RelativeSource FindAncestor, AncestorType={x:Type local:InformationWindow}}}" />
        </l:InteractionMessageTrigger>
    </i:Interaction.Triggers>

    <DockPanel>
        <!-- キャプションバー ここから -->
        <DockPanel metro:MetroWindow.IsCaptionBar="True" DockPanel.Dock="Top">
            <Border DockPanel.Dock="Bottom"
                    Height="4" />
            <StackPanel Orientation="Horizontal" DockPanel.Dock="Right">
                <metro:CaptionButton
                    Style="{DynamicResource PinButtonStyleKey}"
                    VerticalAlignment="Top"
                    IsChecked="{Binding Setting.TopMost, Mode=TwoWay}" />

                <metro:CaptionButton WindowAction="Minimize" VerticalAlignment="Top" >
                    <Path Style="{DynamicResource MinimizeIconKey}"/>
                </metro:CaptionButton>
            </StackPanel>

            <TextBlock Text="艦隊情報 - プラグインテスト" HorizontalAlignment="Left"
                       Style="{DynamicResource CaptionTextStyleKey}"
                       Margin="2,0,8,0" />
        </DockPanel>
        <!-- キャプションバー ここまで -->
        <ScrollViewer VerticalScrollBarVisibility="Auto" HorizontalScrollBarVisibility="Auto">
            <local:Information DataContext="{Binding Info, Mode=OneWay}"/>
        </ScrollViewer>
    </DockPanel>
</metro:MetroWindow>
- InformationWindow.xaml.cs
/// <summary>
/// InformationWindow.xaml の相互作用ロジック
/// </summary>
public partial class InformationWindow
{
    public InformationWindow()
    {
        InitializeComponent();
    }

    /// <summary>
    /// ウィンドウを表示する
    /// </summary>
    public void ShowWindow()
    {
        this.Show();
    }
}
3.プラグイン本体を変更
今まで艦隊情報ウィンドウを表示していた部分を削除します。(ここではわかりやすくするためにコメントアウトしています)
class Plugin : IPlugin, IDisposable
{
    private Views.InformationWindow info;  //メインのView
    private ViewModels.InformationWindowViewModel infovm;    //メインのViewModel

    public Plugin()
    {
    }

    //プラグインが読み込まれたときに呼ばれる
    public void Initialize()
    {
        SettingsHost.LoadFile();    //設定をロード

        infovm = new ViewModels.InformationWindowViewModel(nameof(Views.InformationWindow));
        info = new Views.InformationWindow
        {
            DataContext = infovm
        };
        //info.Show(); //表示タイミングを変更
    }

    public void Dispose()
    {
        //ここに終了時の処理を書く
        SettingsHost.SaveFile();    //設定をセーブ
    }
}
Livetを使うことで簡単にViewModelからViewの関数を簡単に呼ぶことが出来ました。 連載はここで終了です。